


filmQA pro™ fiducial registration templates
- FilmQA Pro allows to detect fiducial marks automatically. All parameters and methods used to detect fiducial positions on an image is stored in a “Fiducial Registration Template”. This step by step example creates a fiducial registration template for films used with GafChromic Quick Phantom.
Fiducial Registration Template editor is part of the Image Viewer and Editor Tool, i.e. any treatment object including an image can be used to edit registration templates.
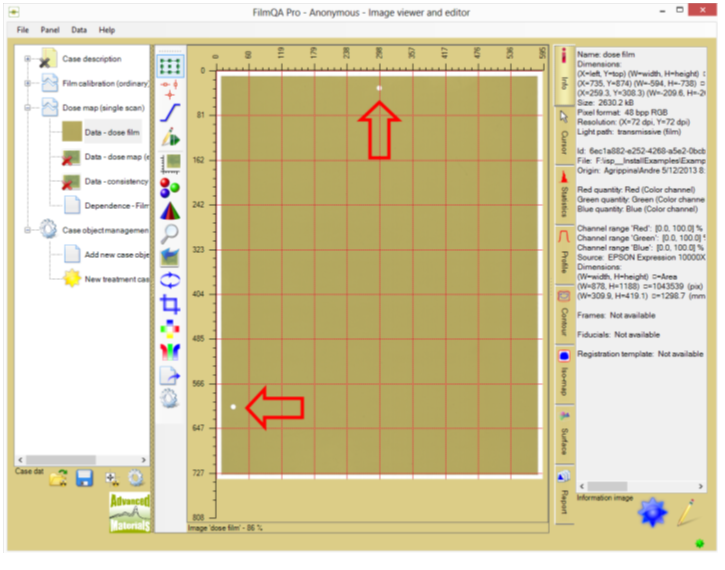
Add a “Dose map (single scan)” object to your case and load the image of the blank film of the GafChromic Phantom from folder ‘Example EBT3 GafChromic Phantom’.
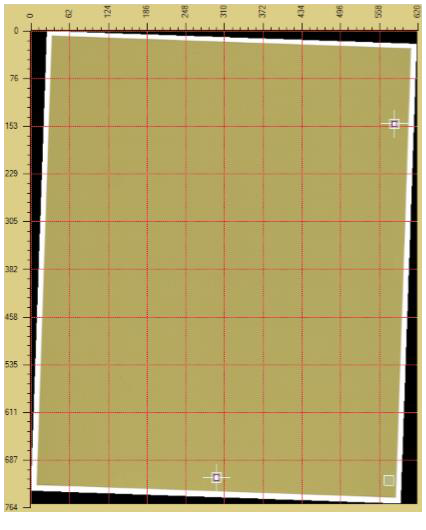
The GafChromic Quick Phantom uses 2 positioning pins as shown in the image below.
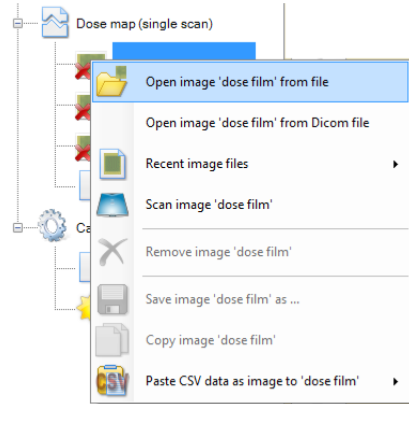
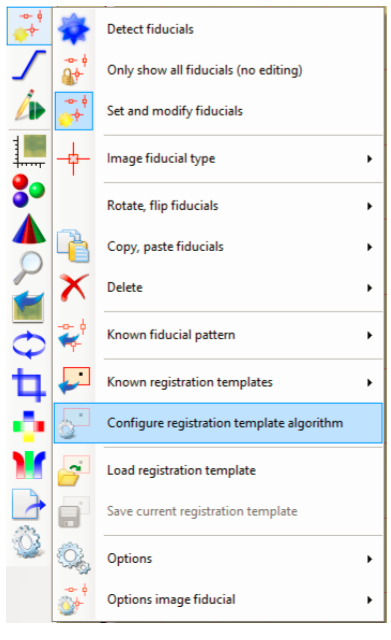
To start the Registration Template Editor invoke “Configure registration template algorithm” of the fiducial management tool as shown below.
To start with the default state reset all settings using the  button at the right by creating a new template. The editor should look as shown below.
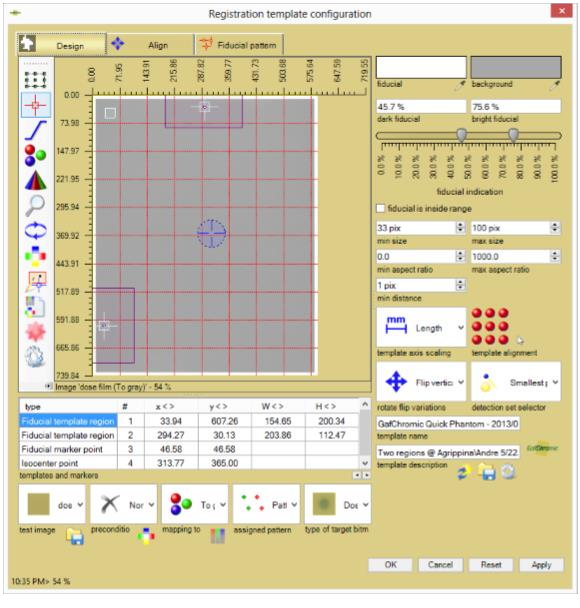
Registration Template Design
- Select “Test Image”.
Image to test current settings of the algorithm in real time. - Select “Preconditioning filter”.
Filter used to precondition image before detecting - Gaussian filter helps when the image includes high level noise (slows detection noticeable)· - Select “Mapping to monochrome”.
Determines the signal used for detection, converts RGB color value into single number. - Select “Assigned pattern”.
“Pattern only”: Adds to the image general fiducials at detected template positions as well as corresponding marker and isocenter resulting from detected points. Example with EBT3P film is shown below including 2 detections and 1 marker. Selected as “Registration type” in the image comparer tool “Fit registrant fiducial pattern to pattern of reference”.
“Isocenter vertical and horizontal fiducials”: Adds to the image isocenter and 4 fiducials marking the orientation of the isocenter. Detected positions are added as marker fiducials.
Example with EBT3P film is shown below including 2 detections and 1 marker. Selected as “Registration type” in the image comparer tool “Fit registrant fiducial to isocross of reference” or use “Adjust isocenter offset”.
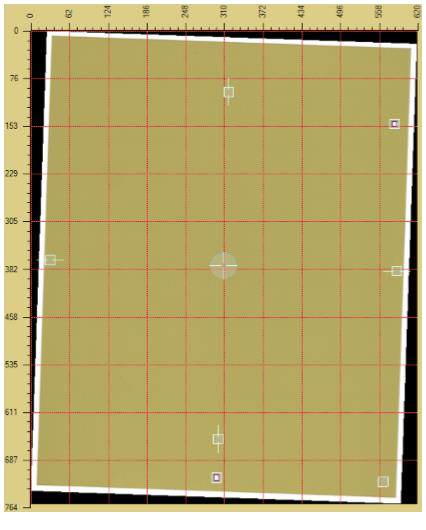
“Isocenter corner fiducials”: Variation of above option that adds 4 general fiducials marking a square around the isocenter that can be fitted to the isocross of the plan (reference). Example with EBT3P film is shown.

- Select “Type of target bitmap”.
Image type the registration template can be applied to. Most common are ‘Dose map’ objects that includes the following image types: Dose film, Dose map, Uniformity map, Consitency map. Select which of the images the registration template should be applied to. - Select “Fiducial color”
 .
.
Click dropper icon, then click the position at the test image presenting the color of the fiducial marker to be detected. Resulting mapping value will be assigned as bright or dark fiducial of the fiducial indication range. - Select “Background color” .
Click dropper icon, then click the position at the test image presenting the color of the background that surrounds the fiducial marker to be detected. Resulting mapping value will be assigned as bright or dark fiducial of the fiducial indication range. - “Fiducial indication” range determines what values are considered to be part of the fiducial pattern to be detected.
- Select “Fiducial is inside range”.
The fiducial mark area can be detected either by values insider or outside of the above defined fiducial indication range. - Select “Minimum size” and “Maximum size”.
Minimum and maximum size of the fiducial mark areas - marks smaller or bigger are ignored. - Select “Minimum aspect ratio” and “Maximum aspect ratio”.
Minimum and maximum aspect ratio of the detected fiducial mark areas - allows to exclude line artifacts. - Select “Minimum distance” between fiducials.
Fiducial mark areas that are closer than the set minimum distance are merged. - Select “Template axis scaling”.
Scaling used to match template to the image.
“Pixel”: Template is scaled maintaining its pixel size.
“Length”: Template is scaled maintaining its absolute size (length).
“Normalized”: Template is scaled to full image (relative scaling). - Select “Template alignments”
 .
.
Alignments of the template relative to the selected image position tested to detect fiducial pattern matching the registration template. Click the bullet of the position to be included (red), right click for more options. - Select “Rotate flip variations”.
Flipping and rotation tested to detect fiducial pattern matching the registration template. - Select “Detection set selector”.
Method to select best detected fiducial pattern.
“Smallest point offset”: Prefers fiducial pattern with points as close as possible to the center of the template regions
“Smallest line length offset”: Prefers fiducial pattern with points having the same distance from each other as the corresponding template regions - Select “Template name”, “Template description”, “Template icon”.
Data to identify this registration template in a selection list. Use button to save or load regiz - Select “Fiducial template regions”.
Marks area where a fiducial mark area should be detected - one for each template region.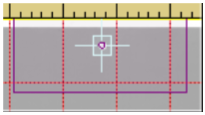
- Select "Fiducial marker point"
 .
.
Marker point is added to a fiducial pattern to break symmetry and allow unique match (e.g. 2 fiducials determine position in a plane except for 180° rotation). Right click a template region to convert into a marker point. Marker points are assigned having the same distance to the detected points as the marker points to the template regions. - Select "Isocenter"
 .
.
Isocenter point determines the isocenter position relative to the template regions (center points). Handling is the same as marker points. - “Template and markers” table:
Shows numerical values of the template region, markers and isocenter using same scaling as the image axes (right click axis to change scaling and unit). Example below shows numerical values in inch for EBT3P film.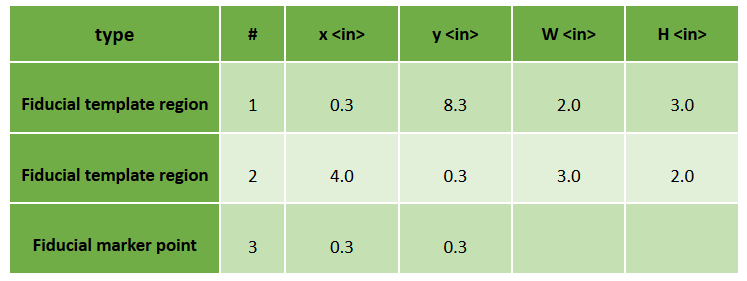
Read More >